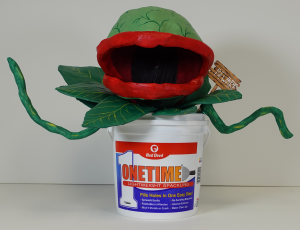
For many DIYers and Pros, using spackling has become a prevalent practice in the last few years. Common uses for products like Onetime® Lightweight Spackling are typically for filling holes, dents, or cracks in drywall, but this product has many innovative uses. Below are some of our favorite “off-the-wall” uses for spackling. We hope this review will be some creative inspiration for you the next time you use Onetime® Lightweight Spackling.
Innovative Uses for Spackle
What makes spackling innovative? Is it the product itself or the user, or both? We feel that it is both because you can tackle the most challenging projects that you can dream up when you have an innovative product.
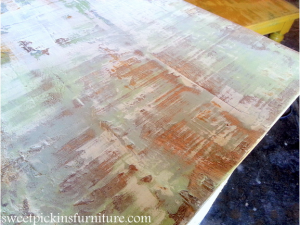
1. Layer Painting with Spackle
Spackling is primarily used to fill in holes and cracks, not generally used to paint. However, as with this example, it can also be used along with paint to give a rough a textured look to one’s home furnishing, like a dresser or table.
Supplies List
- Lightweight Spackling
- Paint (your color choice)
- Putty Knife
- Sander/Steel Wool
How It’s Done
First, the user will need a tool, like our Flex Putty Knife, to trowel on the spackle, and paint.

Now begins the application of the colors you have chosen to paint/texture the furniture. One color can be selected or three or four, but whatever the amount, it does help to have an underlying color scheme and not just random spackles of color. You can choose to apply regular brush strokes on the piece, or a smear technique that will help give it that rough and weathered look. After the colors have been used on the furnishing, let it sit and dry in the sun for two or three hours.
After drying comes the final step, sanding. If this step is not done, the spackle and paint may not have that rough and textured look like you’re imagining.
Tip:Try using the sander horizontally across the piece in forwarding motion swings so that you no sections are left un-sanded. Also, test the sander on a small section to see how much the sander absorbs the wood grains; it’s never good to get too much taken off.
For more projects and ideas from this creative, visit their site.
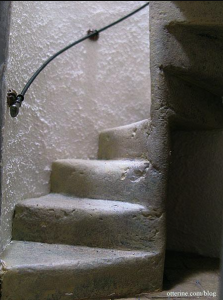
2. Spackling Up the Stairs
Did you know that spackle can be used around your home to make or fix things more than just cracked walls? One user applied spackling to the steps of their curved staircase.
Supplies List
• Although we do not have a supplies list for this example, be sure to visit his profile.
How It’s Done
In this example, the user applies spackling to mimic the look of stones. However, his blog shows examples of spackling also being used in other projects like a fireplace.
3. Stencil It In
Spackling can also be used to create stencils that give a raised dimensional effect. Have you ever toured an old cathedral or building and wondered, “How did they get that fantastic artwork up there?” These stencils can be painted or spackled on most surfaces; however, chairs, ceilings, etc. are the most common.
Supplies List
- Lightweight Spackling
- Sander/Steel Wool
- Painter’s Tape

How It’s Done
It is easy. First, sand the area of the surface where you will be stenciling. Next, secure the stencil with the painter’s tape to the place where you will be working. Then apply the stirred, colored spackle onto the surface or wait until after the spackling dries to apply the paint. Finally, remove the stencil mold and view your finished product.
Tip: For more information, click here.
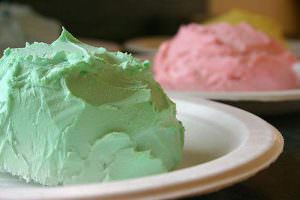
4. Everything that Spackles
For those who love to get creative with food, especially styrofoam sweets, this is right up your alley, or should I say mixer.

One of our Onetime® Lightweight Spackling users created a cupcake that looks, smells, and feels like a cake. Don’t try to eat it like an ordinary cake because it’s frosting is made out of spackling.
The cake itself has very minimal supplies (yes, it’s true, you can be creative with just a few materials even when your project is not very detailed) and looks fantastic.
Supplies List
- Styrofoam Ball and Cone
- Food Coloring (your color choice)
- Craft Paint
- Putty Knife
- Lightweight Spackling

How It’s Done
Start by cutting the styrofoam ball and cone in half and place the halves together to form a cupcake shape. Next, mix the lightweight spackling with just one or two drops of your choice(s) of food coloring.
Tip: A putty knife can be used to apply the colored spackling to the styrofoam.
Finally, you can decorate the styrofoam cupcake with your favorite birthday party favors, sprinkles, or more icing.
The beauty of this cupcake is you don’t even have to bake it in the oven, so there’s no wait time. To view more projects by this user, visit here.
Who knew that so many off-the-wall projects that could be done with spackling? Although it is commonly known as a wall filler to cover wall damage, it can be used for so much more. We (may be a bit prejudice) think there is none better than our Red Devil® Onetime® Lightweight Spackling.
Let these unique ideas be an inspiration for your next spackling project. Remember the sky’s the limit, or should we say spackles the limit.
Creativity From the Red Devil® Family
We challenged our employees to create innovative and creative projects with our Onetime® Lightweight Spackling. Below are a few of our favorite off-the-wall project submissions.

This three dimensional Halloween inspired graveyard was created by Tanya T.
This off-the-wall piece was created by Dakota M.
Do you have questions or interesting projects that you have used our Onetime® Lightweight Spackling on in the past? If you do, connect with us here or comment below.