Below are some of our favorite Halloween inspired DIY projects we collected from around the internet using caulks and sealants.
Spiderweb Pumpkin
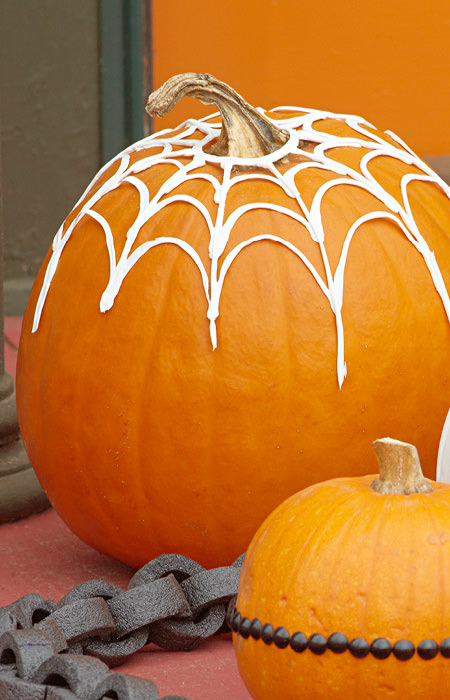
This project was by our friends at Lowe's. If you are a beginner or looking for an easy project, this may be the one for you. Find this project and other Halloween inspired DIYs from Lowe's here.
GRAB LIST
- Utility knife
- Wax paper
- Caulk Spiderweb Pattern
- Painter’s tape
- A White Latex Sealant (We Red Devil LIFETIME® Ultra 230 Premium Acrylic Latex Sealant White Squeeze Tube)
Step 1
Print the spiderweb template on 11 x 17 paper (Lowe's has one here that you can download). Cut a piece of waxed paper long enough to cover the spiderweb pattern. Tape the template and then the waxed paper on a flat surface.
Step 2
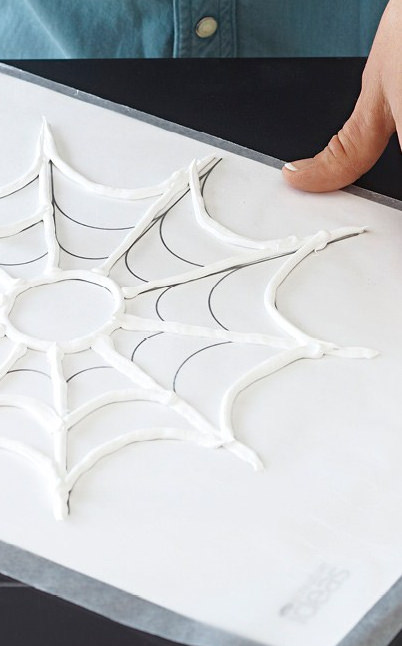
Apply caulk over the pattern.
Cut the tip from the caulk tube to form a thin bead between 1/8 inch and 3/16 inch wide. Begin by following the pattern to lay the center circle. Then make the 10 legs of the spiderweb.
Tips From Lowe's
A squeeze-tube of caulk is sufficient to make two or three spiderwebs. For more or larger webs, use a 10-ounce tube in a caulking gun with the tip cut to make the same diameter beads.
Step 3
Connect the legs of the spiderweb.
Connect each leg to the adjoining legs with three arcs. Allow the caulk to dry for 24 hours.
Step 4
Caulk makes a spooky spiderweb when draped over a pumpkin or other Halloween decorations.
Peel the web off the waxed paper. Pass the pumpkin stem through the center hole and allow the web to drape loosely around the top of the pumpkin.
Going the Extra Mile
You can add a little more of a punch by painting the pumpkin or adding other decorations. Find some ideas here.
Homemade Halloween Wreath
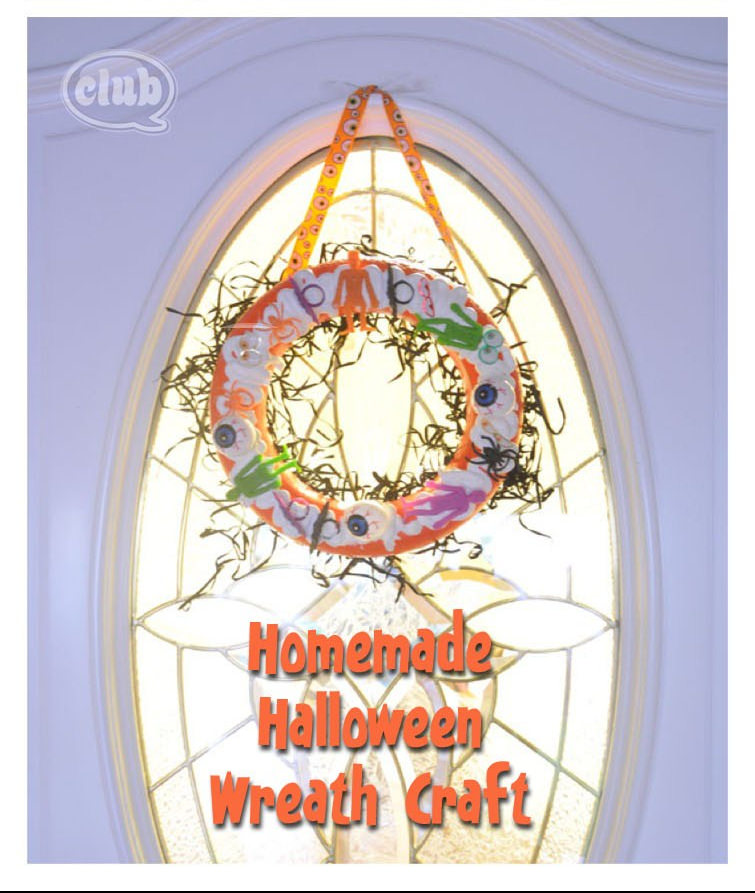
This wreath is another easy project that also allows you to customize it and can also be adapted for different seasons and themes. This project and countless others are featured on the Chica Circle website.
GRAB LIST
- Styrofoam ring for a wreath
- Various Halloween plastic toys or decorations
- Hot Glue Gun
- White Kitchen & Bath Sealant (We recommend Red Devil Bright White Kitchen & Bath Sealant Squeeze Tube)
Step 1
Squirt the Kitchen and Bath Sealant onto the Styrofoam ring. If you would like to be creative you can create a zig zag pattern to add another interesting element to your wreath.
Step 3
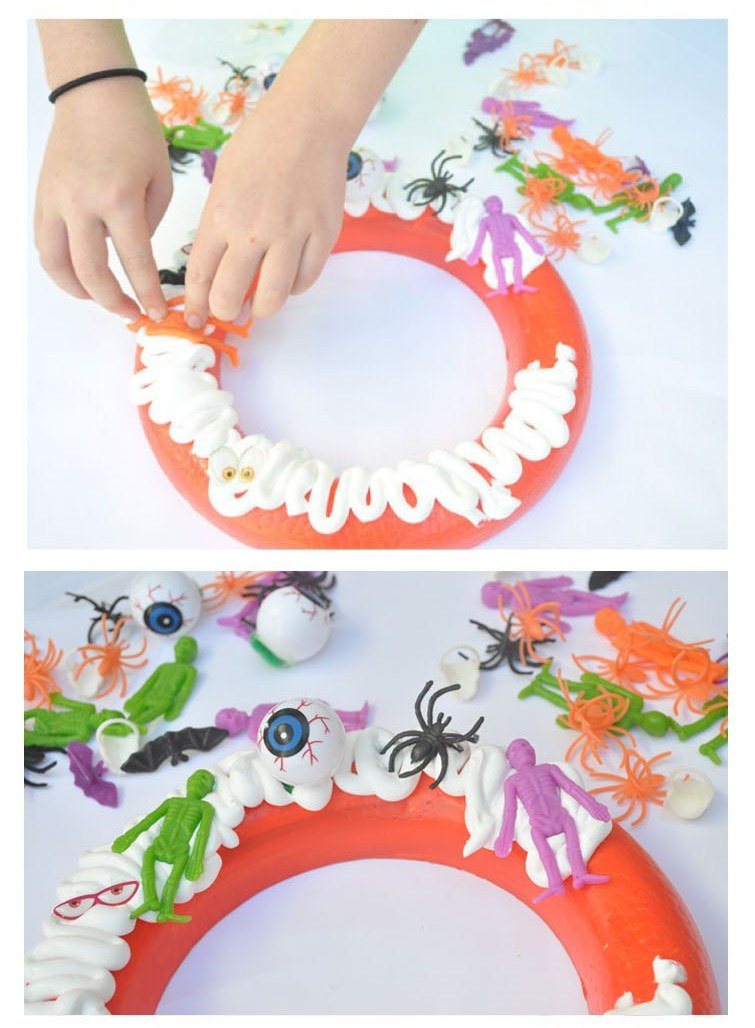
Place your Halloween decorations on top of the caulk.
Step 4
Take a break and allow the caulk to completely dry. Depending on how thickly the caulk was applied, this could take a few hours or longer. You may take a look at the dry time on the product instructions and use that as a guide.
Step 5
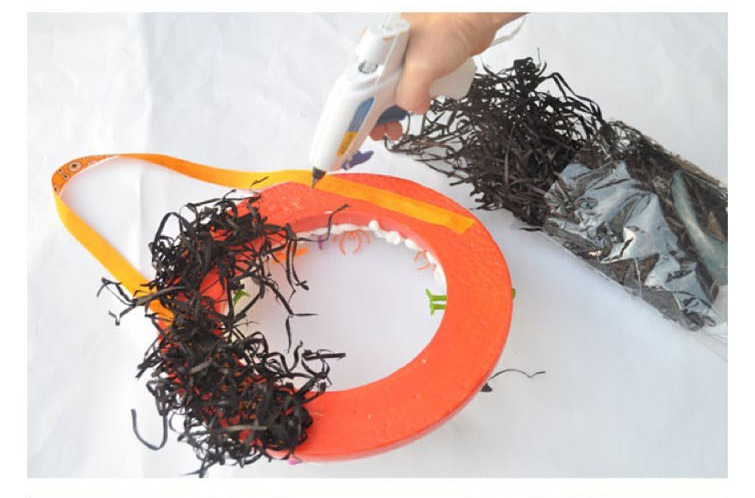 If you would like to add a little more decoration, an option is to use a hot glue gun to adhere ribbon or shredded paper (gift filler) to the back of the wreath.
Going the Extra Mile
This craft can also be adapted to create a picture frame.
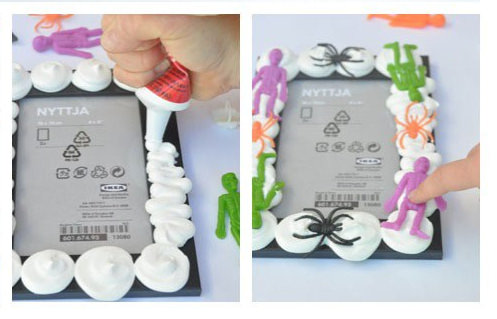
For the frame, use the sealant tube much like you would if you were decorating cupcakes. You are free to create whatever pattern you would like, but for the example, she swirled on little dots along the bottom and zig-zag swirls along the sides. She also cut off the rings from the plastic rings so that the spiders laid flat on top of the sealant. Be sure to let the sealant fully dry before touching it.
Caulk Decorated Candy Jar
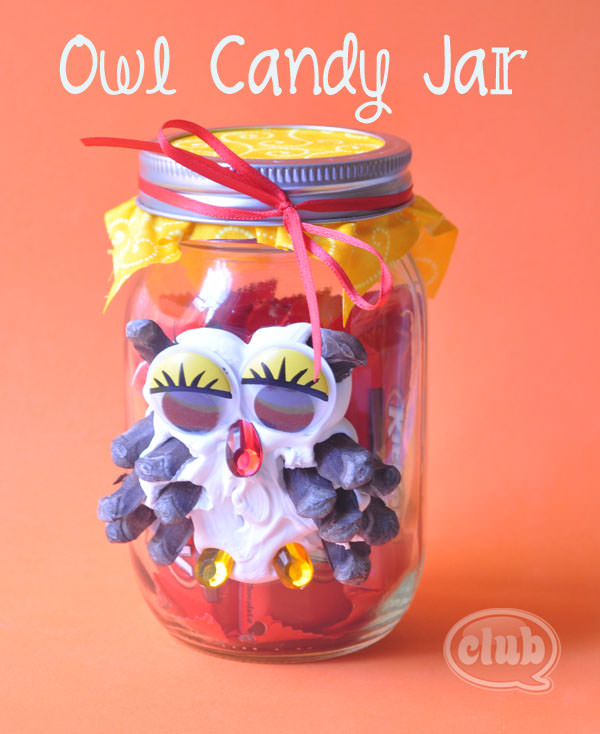
If you are looking for a creative way to contain your Halloween candy, the master crafter at the Chica Circle website created this DIY just for you. Any design can be used for this project. but for the example, she went with an owl.
GRAB LIST
- Pint Mason Jar
- Pine Cone
- Googly Eyes
- Teardrop-shaped Jewels
- White Kitchen & Bath Sealant (We recommend Red Devil Bright White Kitchen & Bath Sealant)
- A Caulk Gun
For the owl candy jar, I used a pint sized mason jar. I used a pine cone for the feathers, big googly eyes, and some teardrop shaped jewels for the nose and feet, as well as the caulk for the body shape.
Step 1
Lay the mason jar on its side so it was easier to work with. Also prepare the pinecones for use by breaking it off pieces in a bowl.
Step 2
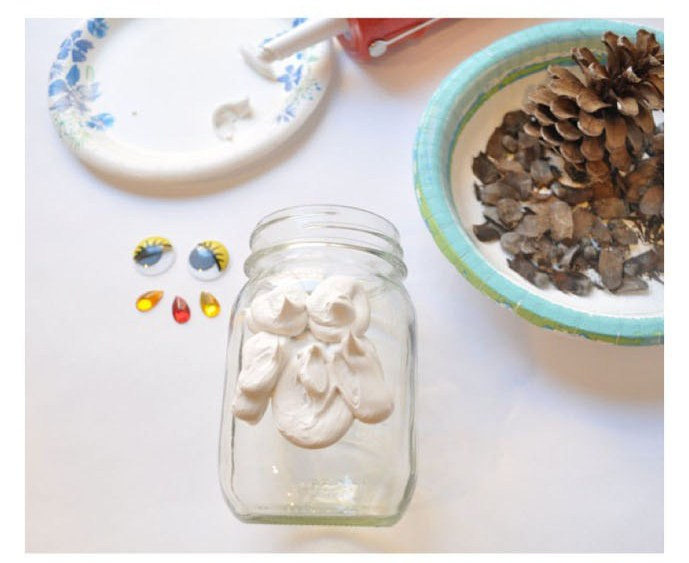 Create the oval shape for the owl body by squirting the sealant onto the mason jar. Then using the sealant, create two smaller oval shapes on either side for the wings and finish off with two circle shapes on top for the eyes.
Tips From Chica Circle
- This project can be done with a squeeze tube, but for the example project, a cartridge was used. It is recommended to use whichever you are most comfortable with.
- When using the caulk gun, cut a larger hole in the tip than normal so the caulk comes out nice and thick. Unless you have a caulk gun that will cut off the flow of caulk, have a paper plate handy so that when you're done applying caulk to the jar, you can prevent the caulk from continuing to squirt out.
Step 3
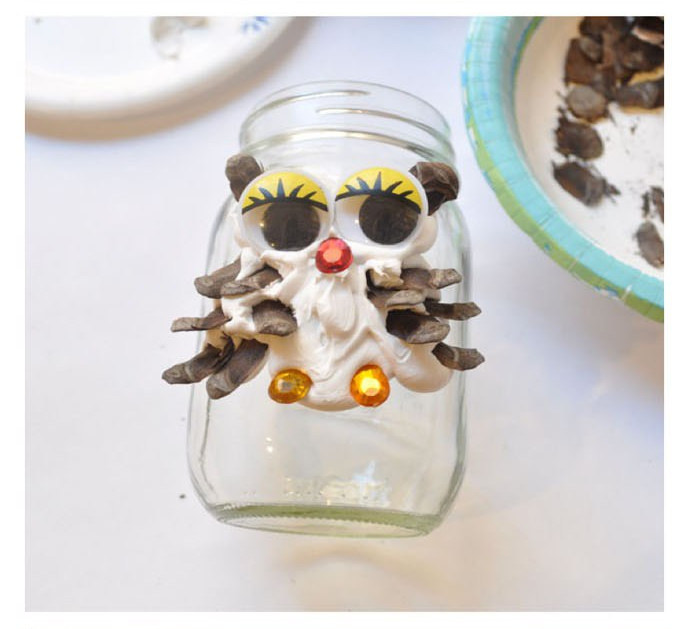 Press the two large googly eyes into the caulk, and start attaching the pine cone pieces on each side for the wing feathers. You can also insert two pine cone pieces just above and under each googly eye. In the example, a red teardrop shaped jewel was used for the nose, and two yellow teardrop jewels at the bottom for the feet.
Step 4
Once you are satisfied with the design, allow it to dry overnight before touching.
Step 5
To finish off the jar, cut a small square of coordinating fabric along with some thin ribbon. The fabric and be closed up in the lid and the ribbon used to tie a bow around the mouth of the mason jar.
GOING THE EXTRA MILE
This project can also be adapted to a cupcake design. To do this use:
- 4 oz Mason Jar
- Seed Beads
- A glittery bell for a cherry
- White Spray Paint
- A Hot Glue Gun
- A Caulk Gun
- White Kitchen & Bath Sealant (We recommend Red Devil Bright White Kitchen & Bath Sealant)
 Step 1 Start by spray painting the lid of the mason jar white. After the lid is dry, use a hot glue gun to glue the top to the screw part of the lid so that it was one solid piece. Step 2
  Using a caulk gun (with a wide hole cut on the gun so that it comes out pretty thick), squirt the caulk in a spiral, much like if I you were frosting a real cupcake. Step 3 Sprinkle on beads for sprinkles, and press on a cute glittery bell for the cherry. You could also use a round bead there too. Step 4
  Let it dry overnight before filling it with candy. Finish off with tying some coordinating ribbon around the lid and you are done!
Mod Swirly Pumpkin
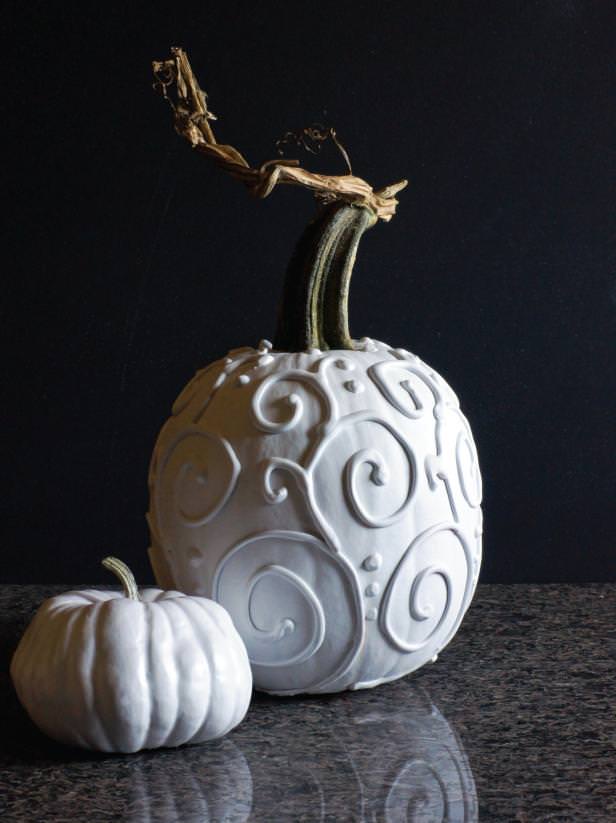
This DIY was created by the experts at HGTV to bring a little modern flair to your fall décor. They describe this project as both simple and inexpensive.
GRAB LIST
- A Pie Pumpkin
- Silicone caulk (We recommend Red Devil Kitchen & Bath Acrylic Siliconized Caulk)
- Painter’s tape
- A Permanent marker
- News print
- Flat white spray paint
Steps 1
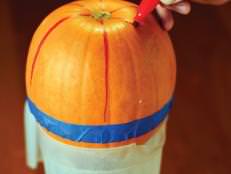
Turn the pumpkin upside down in a container that will protect the stem. Use a permanent marker to make six approximately equal sections. Use the natural grooves in the pumpkin as your guide and draw the lines from the bottom to the top of the pumpkin. Wrap painter’s tape around the middle of the pumpkin horizontally.
Step 2
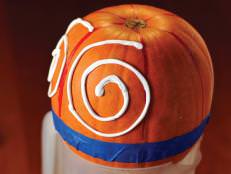
Starting close to the bottom of the pumpkin, make a swirl with the silicone caulk starting on the outside and working toward the center. The outside edge of the swirl should be close to the section lines and up to the painter’s tape.
Repeat for all six sections. Allow to harden completely before proceeding. When the bottom swirls have hardened, turn the pumpkin over and remove the painter’s tape. At about 1 o’clock on the bottom swirls make another swirl in the opposite direction. This swirl should be about 2/3 the size of the first swirl and the center of the swirl should line up with the section lines you have drawn. Now draw another swirl at 11 o’clock on the second row of swirls. This swirl should be about ½ the size of the last swirl and go in the opposite direction.
TIPS FROM HGTV
- If you are not satisfied with the outcome of your swirl simply wipe away the caulk with a paper towel and start over.
- After caulk has hardened slightly, use your fingertip to press down any points that are sticking up.
Make small curls with the silicone caulk at 9 o’clock on the second row of swirls and at 2 o’clock of the top row of swirls. Add three dots vertically between each of the bottom swirls. Add one dot between each of the top swirls and one dot just above each of the top swirls. Allow caulk to harden completely.
Step 3
Apply painter's tape to the edge of some newsprint with half of the tape adhesive exposed. Wrap the exposed portion around the stem base and press firmly. Twist the paper together over the stem to ensure that it is completely masked before painting.
Paint the entire pumpkin with flat white spray paint. It may take a couple of coats (especially where you have drawn lines). Allow paint to dry completely and remove masking.
Note: After this project is complete, the pumpkin is no longer edible.
*On all projects, be sure to follow the manufacturer's instructions for safety and handling. Be sure to take the proper safety precautions and to perform projects in a well ventilated area