We've scoured the internet for untraditional ways people are using caulks or sealants for DIY projects around their home. These are the most interesting projects we came across. Take a look at the list below and let us know what you think? Have you tried any of them?
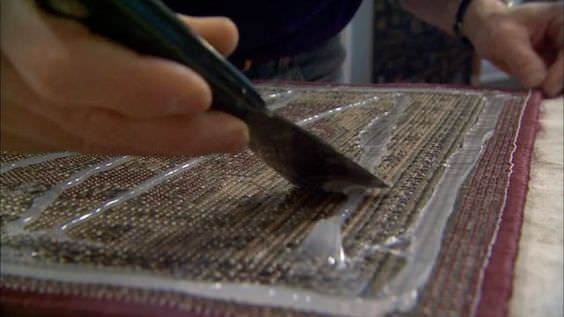
Non-Slip Rug DIY
To increase the traction for your area rugs, many users recommend using a caulk or sealant.
- Simply flip over your rug and apply beads of caulk that are about 6 inches or so apart. Some users were partial to acrylic-latex caulk where others swore by 100% silicone caulks or sealants.
- Let whichever caulk you choose dry and then flip your rug over and test it out.
any users say once the caulk dries, the rubbery strips will hold your rug in place.
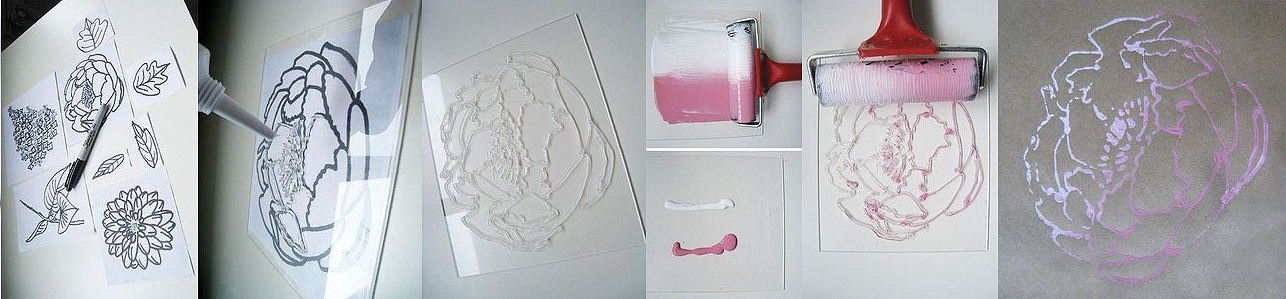
Custom Stamps
For those of you who are in need of a particular stamp that is either hard to find or more than you want to pay, don't worry, with this DIY, you can make it yourself. There are multiple ways to achieve this project, but the one that seems a little easier recommends using a squeeze tube of 100% silicone caulk or sealant and plexiglass.
- Simply take the 2D image you would like to stamp, whether it is a drawing, simplistic photo or text, and place it under the plexiglass.
- Use your squeeze tube of 100% silicone to trace your preferred image onto the plexiglass.
- After the silicone has dried, take a small roller and roll your desired paint color onto your stamp. Then have fun!
DIY Basket
If you are looking for a delicate basket with an intricately woven pattern, then this may be the DIY project for you. We are not sure who came up with this idea, but they were definitely thinking outside of the box.
- Take a bowl that is the desired shape and lay it face down on a level surface.
- Cover the bowl with clear plastic wrap.
- Using a cartridge of acrylic-latex caulk, create your desired pattern and let the caulk dry.
- Once the caulk is dry, gently remove it from the plastic wrap and paint the desired color.
If you would rather the caulk already be your desired paint color, you can create a custom caulk with our Create-A-Color kit.
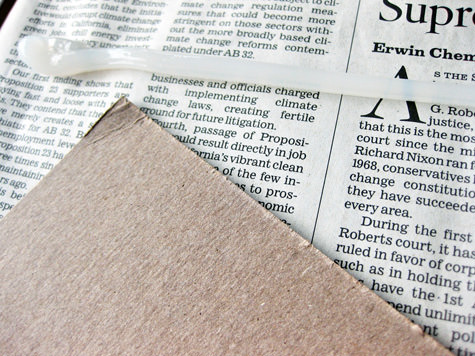
Preserving Fragile Paper
This DIY came from a lover of old books and old newspapers. She was looking for a way to use it as an interesting element in projects but needed a solution to overcoming the fragility of the paper. Her solution was 100% silicone caulk. Here's what she did.
- Take your paper of choice and place it onto of a scrap piece of paper to avoid getting the silicone on anything else.
- Squeeze a heavy bead of 100% silicone caulk across the entire width of the top of the page.
- Take a straight piece of cardboard and squeegee the silicone down the paper so that a thin even layer of silicone covers the paper. Then let the silicone dry.
This technique was said to preserve the pages and make them flexible, waterproof and durable with a finished texture that feels like oilcloth. The DIYer used this technique to make other projects. You can learn more here.
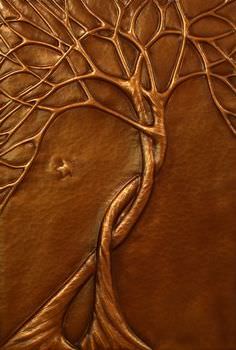
Creating 3D Wall Art
The internet is flooded with DIY project that use caulks and sealants to create 3D wall art. This DIY project is easy to customize and allows you to be as creative as you desire.
- Simply take a wall, canvas or whatever medium drew your eye creatively.
- Using a stencil, a pencil outline or whatever you prefer, draw your image with acrylic-latex caulk.
- Allow the caulk to dry and then paint if that's your desired end result.
Simplify this project by using colored caulk to achieve the desired end result with less painting. Need a custom color? No problem. Learn how to create one here.

Silicone Tipped Bulbs
Silicone bulbs can definitely be an expensive decorative accent, but if it's a must on your list, try this DIY to save some money.
- Test each bulb to make sure it works. Even if the bulb is new, you do not want to put work into a bulb and then find out it never worked.
- Warm the silicone before dipping. Heat an empty pan on your stove top to a warm medium setting. Turn the stove off. Lay a tube of silicone in the pan for three minutes. Remove the tube from the pan.
- Empty the silicone from the tube and squeeze the silicone into the throwaway bowl. Tap the bowl a few times to remove air bubbles, squeeze more in and tap. Do not stir the silicone.
- Wrap two turns of the florist wire around the metal part of the bulb. Leave a 2-inch tail of florist wire and clip. Bend the wire tail into a hook shape.
- Dip the bulb into the center of the bowl filled with silicone. Make sure the entire bulb is covered, but do not cover any of the metal part.
- Pull the bulb out of the silicone, using a twisting motion as you lift. This will help the silicone form a ripple-type pattern. For a smooth surface pattern, lift the bulb out without twisting. Go slowly and even slow down as the tip of the bulb emerges. This will help you create a long tip.
- Hang the bulbs spread out on the clothesline so they can dry for approximately three hours. Use the wire to hang it by. Do not touch the tip. It will lengthen as it dries.
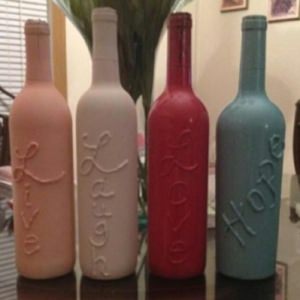
Decorative wine glasses and jars
There are multiple DIY projects using wine glasses and glass jars. Projects range from holiday themed snowmen to the highly intricate henna patterns. Regardless of what decoration you would like to create, grab your acrylic- latex caulk cartridge or squeeze tube and see where your creativity takes you. Some artists paint the bottle before applying the caulk, some paint after so that the caulk is just a 3D element and some leave the glass clear and just let the caulk shine. The choice is yours.
As you can see, there are plenty untraditional ways to creatively use caulks and sealants around your home. Grab a cartridge or squeeze tube of a Red Devil caulk or sealant and see what you can create.
—
Are you a pro with tips of your own? Contact us at blog@reddevil.com to share your knowledge or comment below.
Do you have questions about your home improvement project? Connect with us at blog@reddevil.com or comment below to receive help from one of our pros.